Revised: 5/21/2013 Subject to Revisions
Fabricating Higher Precision Axles
The previous process for fabrication axles resulted in noticeable differences in diameters between opposite ends. This was due to slight misalignment of the lathe spindle headstock with the lathe bed way. The headstock is keyed in place with a removable alignment key and can be rotated to various angles if need be. The author elected to keep the headstock key in place and make shorter cuts closer to the chuck so that a potentially difficult alignment procedure could be avoided until one is developed.
Mostly Manual Axle Turning Process
The author elected to turn each end of the axle extended about the same distance from the chuck. Machining would make small depth steps with intermediate measurements to achieve a higher degree of accuracy of critical diameters, particularly the wheel mounting region. The same machining procedure would be done on both ends then the middle of axle turned to shape. In this way both ends would wind up with more exact dimensions and achieve a suitable size for press fitting the wheels in place.
First end of axle with five diameter regions
First turned end of axle
Marks on above axle show approximate end and center regions. The first end has been turned. The CNC mill was used with the CNC control software in the manual mode, not programmed with G-Code. The author would set the depth and length of each cut by manually changing the parameters on the CNC control software. Parameters included depth, length and speed of each cut. Only one such cut can be done at a time in this manner. After each cut a micrometer was used to measure the result and an estimate of the next depth of cut made. The new depth and the previous length and speed were then manually done.
The advantage of using the CNC in the manual mode is that each depth change can be made in very small, accurate increments down to 0.0001" steps. This proved to readily achieve results repeatedly of less than 0.0005" accuracy.
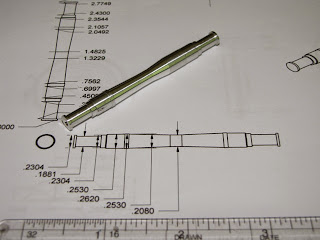
Axle blank with both ends machined
The above photo shows the axle after machining both ends. The print comes from the author's Alibre Professional CAD software and shows the various diameters and positions of the axle sections. The center portion remains to be cut.
The center portion has two matching tapers. These cannot be cut using manual CNC control as only one axis may move at a time that way. Consequently, the author wrote a fairly simple G-Code program to cut the taper in layers which would do the whole process under program control once started. Only one taper would be cut at a time and the axle reversed in the lathe for the other. That way both taper ends would approach the largest diameter band that limits the inward position of each wheel.
Cutting the center to an initial diameter
Before running the G-Code program the center portion was set-up and cut down to the diameter of the wheel inner limit rings. Those rings stop the wheels at the proper gauge when being pressed in place. The stop ring cut was made manually. The end of the axle was supported in a live center on the lathe to keep the axle running parallel to the turning axis.
Axle after turning the center section to the stop ring diameter
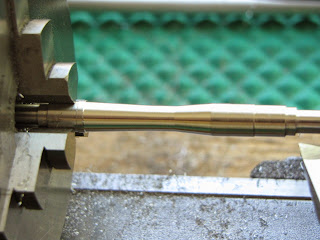
Axle during cutting the first taper nearest the chuck
The center tapers were cut from mid axle to the stop ring nearest the lathe chuck. This was done to keep the stop ring diameter accurate and turned true to the lathe chuck center. It also provided the more rigid arrangement for the taper turn. A lead-in taper at the right side is used to permit the cutting tool to reach the untapered short center region then continue on up the taper to the stop ring near the chuck. Several automatic passes occurred during the programmed run. Each cut layer was programmed for 0.01" thick with a final pass of 0.005".
First taper on left near the chuck after completion
The finished taper in the above photo ends at the wheel stop ring. The axle is chucked on the wheel mount diameter portion which is slightly smaller diameter than the stop ring. The center of the axle has a short flat portion between the tapers. A lead in taper at the right was used to reach the central constant diameter region. The lead in taper is at a sharper angle than the axle taper and the second pass on that portion will cut the final taper to match the first one at the left. This will be done by reversing the axle in the lathe and running the same program to make a matching taper.
Axle with first taper completed
Portion of the G-Code programming for the taper cut
Completed axle with both tapers
To facilitate cutting the axle in this manner, the blank was first cut to exact length so that both ends could be used to align the tooling for cut lengths from the end.


